
Connecting Hermes Agent to LinkedIn via MCP: a step-by-step configuration guide
AI agents are only as useful as the systems they can connect to. An agent that can research, write code, and manage your website but cannot post to LinkedIn is only halfway there: the final part of the editorial cycle, the distribution, still depends on you. In this guide we configure Hermes Agent connected to the official LinkedIn API through a MCP server (Model Context Protocol), so that the agent can read your profile, verify the authentication status, and publish content on your behalf — without scraping, without unofficial APIs, and without any risk to the account.
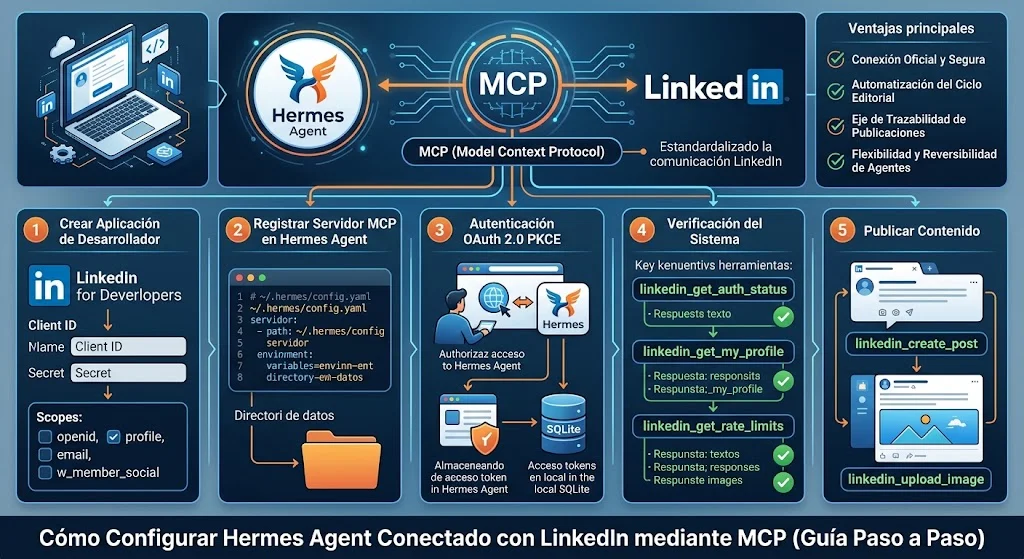
The key to the whole process is the Model Context Protocol: an open standard that defines a universal format for AI agents to communicate with external tools. Instead of programming custom integrations with each platform, you deploy a MCP server that encapsulates the logic of a specific API (in this case, LinkedIn) and exposes its capabilities as tools that any compatible MCP client — including Hermes Agent — can discover and invoke. The result is a standardized, auditable, and reversible connection layer: if tomorrow you want to switch agents, the MCP server keeps working exactly the same.

What you get by connecting Hermes Agent to LinkedIn
The MCP server we use (linkedin-mcp-server) works exclusively with the official LinkedIn API and exposes 15 tools organized into four families:
- Identity: read your profile (name, photo, email), verify the authentication status, and check the API rate limit consumption.
- Publishing: create text posts or posts with images, upload images, delete your posts, and list the ones published through the server.
- Interaction: comment on posts and react (like, celebrate, support, etc.).
- Events: create and query LinkedIn events.
The actual scope of the available tools depends on the OAuth scopes you grant during authentication. A profile with w_member_social unlocks the publishing tools; without that scope, the server only exposes the identity-reading tools.
Prerequisites
Before you start you need four elements:
- Hermes Agent installed and working (check with
hermes --version). - Node.js 20 or higher (
node --version). - An account where you can create developer applications.
- The MCP server cloned into a local directory, for example
~/MCP_SERVERS/linkedin-mcp-server.
Step 1: Create the LinkedIn application
LinkedIn manages access to its API through developer applications. Go to the LinkedIn developer console, log in, and click Create app. Fill in the required fields: the application name, an associated LinkedIn page (it can be your professional profile), and a privacy policy URL (the one from your website works perfectly). Upload a logo and accept the legal agreement.
Once created, copy the Client ID and the Client Secret. These are the credentials the MCP server will use to complete the OAuth 2.0 flow. Treat them like a password: do not upload them to a repository and do not include them in public screenshots.
In the application settings, add the redirect URI you will use in the authentication step (by default, the MCP server uses http://localhost:3000/callback) and enable the scopes you need: openid, profile, email, and, if you are going to publish, w_member_social. Save the changes and wait for LinkedIn to apply them (it can take a few minutes).
Step 2: Register the MCP server in Hermes Agent
Hermes Agent manages MCP servers from its configuration file, usually ~/.hermes/config.yaml. Add an entry in the mcp_servers section with the startup command, the argument for the compiled script, and the environment variables:
mcp_servers:
  linkedin:
    command: node
    args:
      - ~/MCP_SERVERS/linkedin-mcp-server/dist/index.js
    env:
      LINKEDIN_CLIENT_ID: your_client_id_here
      LINKEDIN_CLIENT_SECRET: "your_client_secret_here"
      LINKEDIN_REDIRECT_URI: http://localhost:3000/callback
      LINKEDIN_MCP_DATA_DIR: ~/.linkedin-mcp
    timeout: 120
    connect_timeout: 60
    enabled: true
Two details worth keeping in mind. First, the data dir is where the server persists the OAuth tokens in a SQLite database: if you move it, you lose the authenticated session. Second, if the secret contains special characters, wrap it in quotes so you don’t break the YAML.
Once the file is saved, restart Hermes Agent so it loads the new server. In a CLI session it is enough to exit (/exit or Ctrl+C) and relaunch; if you run it as a gateway, use the restart command corresponding to your installation.
Step 3: OAuth 2.0 authentication
The first time the agent needs to talk to LinkedIn, it starts the authentication flow. In Hermes Agent it is enough to ask the agent to start the LinkedIn authentication; internally it invokes the linkedin_auth_start tool, which opens the authorization URL in your browser with the OAuth 2.0 PKCE flow. Log in to your account, review the requested permissions, and accept.
LinkedIn redirects to the callback URL with an authorization code. That code is exchanged, through the linkedin_auth_callback tool, for an access token that the server stores encrypted in the local database. From that moment on, and until the token expires, the server re-authenticates automatically at every startup: there is no need to repeat the process after restarting Hermes Agent.
A practical tip: if your browser session is already logged in, the whole flow takes less than a minute. If you run it on a remote server without a graphical browser, copy the authorization URL to your local machine, complete the login there, and paste the callback code back into the terminal.
Verification: how to check that everything works
Do not take a system for granted on the basis of its configuration: verify its real state with calls to the tools. The recommended order is:
1. Authentication status. Ask the agent to check the session state. The linkedin_get_auth_status tool should respond authenticated: true with your name and user ID.
2. Profile reading. The linkedin_get_my_profile tool returns the name, the verified email, the locale, and the URL of your profile photo. If this call returns a permissions error, review the scopes granted in the application.
3. Rate limits. linkedin_get_rate_limits shows the real consumption of each endpoint (for example, 1 of 80 calls per day for the profile reading) and the reset time. It is useful before planning publishing campaigns with several posts a day.
If the three checks pass, the system is operational end to end. In a real scenario, the full verification is done in a single conversation: the agent calls the three tools, summarizes the state, and shows you the profile data without you having to type anything.
Publish your first content
With the connection verified, the publishing flow is reduced to asking for it in natural language. For a text post, the linkedin_create_post tool accepts the body and, optionally, a full article. For posts with images, the order is first linkedin_upload_image (which returns an identifier) and then the post referencing it.
The server keeps a local post history in the same database, with the LinkedIn URN of each publication created through it. This allows two things: to query what has been published and when, and to delete any post with linkedin_delete_post if something goes wrong. It is a traceability that, in editorial content workflows, makes the difference between an experiment and a managed publishing channel.
For interaction, the comment and reaction tools follow the same pattern: they are invoked specifying the URN of the target post. Combined with scheduled tasks in Hermes Agent (for example, a recurring job that drafts the weekly summary and sends it as a draft for approval), the complete loop is closed: production, human review, and publishing.
Security best practices
- Least privilege: request only the scopes you actually use. An agent that only distributes does not need permissions it will never exercise.
- Credentials out of the code: the Client ID and the Client Secret live in the Hermes Agent configuration, not in the repository. If the project directory is public, review the history.
- Human review before publishing: the safest pattern is for the agent to prepare and the human to approve piece by piece, especially at the beginning. The deletion tools and the local history are the safety net.
- Watch the expiration: OAuth tokens have an expiry date. Check the status periodically and plan the re-authentication before the content campaign stalls out.
Summary
Connecting Hermes Agent to LinkedIn is not a custom integration: it is a standard MCP server, an entry in the configuration file, a one-minute OAuth flow, and three status checks. What you get in return is an agent that closes the complete editorial content cycle — research, write, manage the website, and distribute — with an official, traceable, and reversible connection layer. The next natural step is to combine this connection with scheduled tasks and image generation to have a publishing channel that works autonomously, within a human approval framework that you control.